Material Lead Times helps construction project managers minimize the time and effort required to determine lead time for materials on the job. This feature allows you to improve planning, reduce delays, and keep projects on track.

#wistia_chrome_23 #wistia_grid_29_wrapper .w-css-reset{font-size:14px;} #wistia_chrome_23 #wistia_grid_29_wrapper div.w-css-reset{box-sizing:inherit;box-shadow:none;color:inherit;display:block;float:none;font:inherit;font-family:inherit;font-style:normal;font-weight:normal;font-size:inherit;letter-spacing:0;line-height:inherit;margin:0;max-height:none;max-width:none;min-height:0;min-width:0;padding:0;position:static;text-decoration:none;text-transform:none;text-shadow:none;transition:none;word-wrap:normal;-webkit-tap-highlight-color:rgba(0,0,0,0);-webkit-user-select:none;-webkit-font-smoothing:antialiased} #wistia_chrome_23 #wistia_grid_29_wrapper span.w-css-reset{box-sizing:inherit;box-shadow:none;color:inherit;display:block;float:none;font:inherit;font-family:inherit;font-style:normal;font-weight:normal;font-size:inherit;letter-spacing:0;line-height:inherit;margin:0;max-height:none;max-width:none;min-height:0;min-width:0;padding:0;position:static;text-decoration:none;text-transform:none;text-shadow:none;transition:none;word-wrap:normal;-webkit-tap-highlight-color:rgba(0,0,0,0);-webkit-user-select:none;-webkit-font-smoothing:antialiased} #wistia_chrome_23 #wistia_grid_29_wrapper ul.w-css-reset{box-sizing:inherit;box-shadow:none;color:inherit;display:block;float:none;font:inherit;font-family:inherit;font-style:normal;font-weight:normal;font-size:inherit;letter-spacing:0;line-height:inherit;margin:0;max-height:none;max-width:none;min-height:0;min-width:0;padding:0;position:static;text-decoration:none;text-transform:none;text-shadow:none;transition:none;word-wrap:normal;-webkit-tap-highlight-color:rgba(0,0,0,0);-webkit-user-select:none;-webkit-font-smoothing:antialiased} #wistia_chrome_23 #wistia_grid_29_wrapper li.w-css-reset{box-sizing:inherit;box-shadow:none;color:inherit;display:block;float:none;font:inherit;font-family:inherit;font-style:normal;font-weight:normal;font-size:inherit;letter-spacing:0;line-height:inherit;margin:0;max-height:none;max-width:none;min-height:0;min-width:0;padding:0;position:static;text-decoration:none;text-transform:none;text-shadow:none;transition:none;word-wrap:normal;-webkit-tap-highlight-color:rgba(0,0,0,0);-webkit-user-select:none;-webkit-font-smoothing:antialiased} #wistia_chrome_23 #wistia_grid_29_wrapper label.w-css-reset{box-sizing:inherit;box-shadow:none;color:inherit;display:block;float:none;font:inherit;font-family:inherit;font-style:normal;font-weight:normal;font-size:inherit;letter-spacing:0;line-height:inherit;margin:0;max-height:none;max-width:none;min-height:0;min-width:0;padding:0;position:static;text-decoration:none;text-transform:none;text-shadow:none;transition:none;word-wrap:normal;-webkit-tap-highlight-color:rgba(0,0,0,0);-webkit-user-select:none;-webkit-font-smoothing:antialiased} #wistia_chrome_23 #wistia_grid_29_wrapper fieldset.w-css-reset{box-sizing:inherit;box-shadow:none;color:inherit;display:block;float:none;font:inherit;font-family:inherit;font-style:normal;font-weight:normal;font-size:inherit;letter-spacing:0;line-height:inherit;margin:0;max-height:none;max-width:none;min-height:0;min-width:0;padding:0;position:static;text-decoration:none;text-transform:none;text-shadow:none;transition:none;word-wrap:normal;-webkit-tap-highlight-color:rgba(0,0,0,0);-webkit-user-select:none;-webkit-font-smoothing:antialiased} #wistia_chrome_23 #wistia_grid_29_wrapper button.w-css-reset{box-sizing:inherit;box-shadow:none;color:inherit;display:block;float:none;font:inherit;font-family:inherit;font-style:normal;font-weight:normal;font-size:inherit;letter-spacing:0;line-height:inherit;margin:0;max-height:none;max-width:none;min-height:0;min-width:0;padding:0;position:static;text-decoration:none;text-transform:none;text-shadow:none;transition:none;word-wrap:normal;-webkit-tap-highlight-color:rgba(0,0,0,0);-webkit-user-select:none;-webkit-font-smoothing:antialiased} #wistia_chrome_23 #wistia_grid_29_wrapper img.w-css-reset{box-sizing:inherit;box-shadow:none;color:inherit;display:block;float:none;font:inherit;font-family:inherit;font-style:normal;font-weight:normal;font-size:inherit;letter-spacing:0;line-height:inherit;margin:0;max-height:none;max-width:none;min-height:0;min-width:0;padding:0;position:static;text-decoration:none;text-transform:none;text-shadow:none;transition:none;word-wrap:normal;-webkit-tap-highlight-color:rgba(0,0,0,0);-webkit-user-select:none;-webkit-font-smoothing:antialiased} #wistia_chrome_23 #wistia_grid_29_wrapper a.w-css-reset{box-sizing:inherit;box-shadow:none;color:inherit;display:block;float:none;font:inherit;font-family:inherit;font-style:normal;font-weight:normal;font-size:inherit;letter-spacing:0;line-height:inherit;margin:0;max-height:none;max-width:none;min-height:0;min-width:0;padding:0;position:static;text-decoration:none;text-transform:none;text-shadow:none;transition:none;word-wrap:normal;-webkit-tap-highlight-color:rgba(0,0,0,0);-webkit-user-select:none;-webkit-font-smoothing:antialiased} #wistia_chrome_23 #wistia_grid_29_wrapper svg.w-css-reset{box-sizing:inherit;box-shadow:none;color:inherit;display:block;float:none;font:inherit;font-family:inherit;font-style:normal;font-weight:normal;font-size:inherit;letter-spacing:0;line-height:inherit;margin:0;max-height:none;max-width:none;min-height:0;min-width:0;padding:0;position:static;text-decoration:none;text-transform:none;text-shadow:none;transition:none;word-wrap:normal;-webkit-tap-highlight-color:rgba(0,0,0,0);-webkit-user-select:none;-webkit-font-smoothing:antialiased} #wistia_chrome_23 #wistia_grid_29_wrapper p.w-css-reset{box-sizing:inherit;box-shadow:none;color:inherit;display:block;float:none;font:inherit;font-family:inherit;font-style:normal;font-weight:normal;font-size:inherit;letter-spacing:0;line-height:inherit;margin:0;max-height:none;max-width:none;min-height:0;min-width:0;padding:0;position:static;text-decoration:none;text-transform:none;text-shadow:none;transition:none;word-wrap:normal;-webkit-tap-highlight-color:rgba(0,0,0,0);-webkit-user-select:none;-webkit-font-smoothing:antialiased} #wistia_chrome_23 #wistia_grid_29_wrapper a.w-css-reset{border:0;} #wistia_chrome_23 #wistia_grid_29_wrapper h1.w-css-reset{box-sizing:inherit;box-shadow:none;color:inherit;display:block;float:none;font:inherit;font-family:inherit;font-style:normal;font-weight:normal;font-size:2em;letter-spacing:0;line-height:inherit;margin:0;max-height:none;max-width:none;min-height:0;min-width:0;padding:0;position:static;text-decoration:none;text-transform:none;text-shadow:none;transition:none;word-wrap:normal;-webkit-tap-highlight-color:rgba(0,0,0,0);-webkit-user-select:none;-webkit-font-smoothing:antialiased} #wistia_chrome_23 #wistia_grid_29_wrapper h2.w-css-reset{box-sizing:inherit;box-shadow:none;color:inherit;display:block;float:none;font:inherit;font-family:inherit;font-style:normal;font-weight:normal;font-size:1.5em;letter-spacing:0;line-height:inherit;margin:0;max-height:none;max-width:none;min-height:0;min-width:0;padding:0;position:static;text-decoration:none;text-transform:none;text-shadow:none;transition:none;word-wrap:normal;-webkit-tap-highlight-color:rgba(0,0,0,0);-webkit-user-select:none;-webkit-font-smoothing:antialiased} #wistia_chrome_23 #wistia_grid_29_wrapper h3.w-css-reset{box-sizing:inherit;box-shadow:none;color:inherit;display:block;float:none;font:inherit;font-family:inherit;font-style:normal;font-weight:normal;font-size:1.17em;letter-spacing:0;line-height:inherit;margin:0;max-height:none;max-width:none;min-height:0;min-width:0;padding:0;position:static;text-decoration:none;text-transform:none;text-shadow:none;transition:none;word-wrap:normal;-webkit-tap-highlight-color:rgba(0,0,0,0);-webkit-user-select:none;-webkit-font-smoothing:antialiased} #wistia_chrome_23 #wistia_grid_29_wrapper p.w-css-reset{margin:1.4em 0;} #wistia_chrome_23 #wistia_grid_29_wrapper a.w-css-reset{display:inline;} #wistia_chrome_23 #wistia_grid_29_wrapper span.w-css-reset{display:inline;} #wistia_chrome_23 #wistia_grid_29_wrapper svg.w-css-reset{display:inline;} #wistia_chrome_23 #wistia_grid_29_wrapper ul.w-css-reset{box-sizing:inherit;box-shadow:none;color:inherit;display:block;float:none;font:inherit;font-family:inherit;font-style:normal;font-weight:normal;font-size:inherit;letter-spacing:0;line-height:inherit;margin:0;max-height:none;max-width:none;min-height:0;min-width:0;padding:0;position:static;text-decoration:none;text-transform:none;text-shadow:none;transition:none;word-wrap:normal;-webkit-tap-highlight-color:rgba(0,0,0,0);-webkit-user-select:none;-webkit-font-smoothing:antialiased;list-style-type:none} #wistia_chrome_23 #wistia_grid_29_wrapper ol.w-css-reset{box-sizing:inherit;box-shadow:none;color:inherit;display:block;float:none;font:inherit;font-family:inherit;font-style:normal;font-weight:normal;font-size:inherit;letter-spacing:0;line-height:inherit;margin:0;max-height:none;max-width:none;min-height:0;min-width:0;padding:0;position:static;text-decoration:none;text-transform:none;text-shadow:none;transition:none;word-wrap:normal;-webkit-tap-highlight-color:rgba(0,0,0,0);-webkit-user-select:none;-webkit-font-smoothing:antialiased;list-style-type:none} #wistia_chrome_23 #wistia_grid_29_wrapper li.w-css-reset{box-sizing:inherit;box-shadow:none;color:inherit;display:block;float:none;font:inherit;font-family:inherit;font-style:normal;font-weight:normal;font-size:inherit;letter-spacing:0;line-height:inherit;margin:0;max-height:none;max-width:none;min-height:0;min-width:0;padding:0;position:static;text-decoration:none;text-transform:none;text-shadow:none;transition:none;word-wrap:normal;-webkit-tap-highlight-color:rgba(0,0,0,0);-webkit-user-select:none;-webkit-font-smoothing:antialiased;list-style-type:none} #wistia_chrome_23 #wistia_grid_29_wrapper ul:before.w-css-reset{display:none} #wistia_chrome_23 #wistia_grid_29_wrapper ol:before.w-css-reset{display:none} #wistia_chrome_23 #wistia_grid_29_wrapper li:before.w-css-reset{display:none} #wistia_chrome_23 #wistia_grid_29_wrapper ul:after.w-css-reset{display:none} #wistia_chrome_23 #wistia_grid_29_wrapper ol:after.w-css-reset{display:none} #wistia_chrome_23 #wistia_grid_29_wrapper li:after.w-css-reset{display:none} #wistia_chrome_23 #wistia_grid_29_wrapper label.w-css-reset{background-attachment:scroll;background-color:transparent;background-image:none;background-position:0 0;background-repeat:no-repeat;background-size:100% 100%;float:none;outline:none} #wistia_chrome_23 #wistia_grid_29_wrapper button.w-css-reset{background-attachment:scroll;background-color:transparent;background-image:none;background-position:0 0;background-repeat:no-repeat;background-size:100% 100%;border:0;border-radius:0;outline:none;position:static} #wistia_chrome_23 #wistia_grid_29_wrapper img.w-css-reset{border:0;display:inline-block;vertical-align:top;border-radius:0;outline:none;position:static} #wistia_chrome_23 #wistia_grid_29_wrapper .w-css-reset button::-moz-focus-inner{border: 0;} #wistia_chrome_23 #wistia_grid_29_wrapper .w-css-reset-tree {font-size:14px;} #wistia_chrome_23 #wistia_grid_29_wrapper .w-css-reset-tree div{box-sizing:inherit;box-shadow:none;color:inherit;display:block;float:none;font:inherit;font-family:inherit;font-style:normal;font-weight:normal;font-size:inherit;letter-spacing:0;line-height:inherit;margin:0;max-height:none;max-width:none;min-height:0;min-width:0;padding:0;position:static;text-decoration:none;text-transform:none;text-shadow:none;transition:none;word-wrap:normal;-webkit-tap-highlight-color:rgba(0,0,0,0);-webkit-user-select:none;-webkit-font-smoothing:antialiased} #wistia_chrome_23 #wistia_grid_29_wrapper .w-css-reset-tree span{box-sizing:inherit;box-shadow:none;color:inherit;display:block;float:none;font:inherit;font-family:inherit;font-style:normal;font-weight:normal;font-size:inherit;letter-spacing:0;line-height:inherit;margin:0;max-height:none;max-width:none;min-height:0;min-width:0;padding:0;position:static;text-decoration:none;text-transform:none;text-shadow:none;transition:none;word-wrap:normal;-webkit-tap-highlight-color:rgba(0,0,0,0);-webkit-user-select:none;-webkit-font-smoothing:antialiased} #wistia_chrome_23 #wistia_grid_29_wrapper .w-css-reset-tree ul{box-sizing:inherit;box-shadow:none;color:inherit;display:block;float:none;font:inherit;font-family:inherit;font-style:normal;font-weight:normal;font-size:inherit;letter-spacing:0;line-height:inherit;margin:0;max-height:none;max-width:none;min-height:0;min-width:0;padding:0;position:static;text-decoration:none;text-transform:none;text-shadow:none;transition:none;word-wrap:normal;-webkit-tap-highlight-color:rgba(0,0,0,0);-webkit-user-select:none;-webkit-font-smoothing:antialiased} #wistia_chrome_23 #wistia_grid_29_wrapper .w-css-reset-tree li{box-sizing:inherit;box-shadow:none;color:inherit;display:block;float:none;font:inherit;font-family:inherit;font-style:normal;font-weight:normal;font-size:inherit;letter-spacing:0;line-height:inherit;margin:0;max-height:none;max-width:none;min-height:0;min-width:0;padding:0;position:static;text-decoration:none;text-transform:none;text-shadow:none;transition:none;word-wrap:normal;-webkit-tap-highlight-color:rgba(0,0,0,0);-webkit-user-select:none;-webkit-font-smoothing:antialiased} #wistia_chrome_23 #wistia_grid_29_wrapper .w-css-reset-tree label{box-sizing:inherit;box-shadow:none;color:inherit;display:block;float:none;font:inherit;font-family:inherit;font-style:normal;font-weight:normal;font-size:inherit;letter-spacing:0;line-height:inherit;margin:0;max-height:none;max-width:none;min-height:0;min-width:0;padding:0;position:static;text-decoration:none;text-transform:none;text-shadow:none;transition:none;word-wrap:normal;-webkit-tap-highlight-color:rgba(0,0,0,0);-webkit-user-select:none;-webkit-font-smoothing:antialiased} #wistia_chrome_23 #wistia_grid_29_wrapper .w-css-reset-tree fieldset{box-sizing:inherit;box-shadow:none;color:inherit;display:block;float:none;font:inherit;font-family:inherit;font-style:normal;font-weight:normal;font-size:inherit;letter-spacing:0;line-height:inherit;margin:0;max-height:none;max-width:none;min-height:0;min-width:0;padding:0;position:static;text-decoration:none;text-transform:none;text-shadow:none;transition:none;word-wrap:normal;-webkit-tap-highlight-color:rgba(0,0,0,0);-webkit-user-select:none;-webkit-font-smoothing:antialiased} #wistia_chrome_23 #wistia_grid_29_wrapper .w-css-reset-tree button{box-sizing:inherit;box-shadow:none;color:inherit;display:block;float:none;font:inherit;font-family:inherit;font-style:normal;font-weight:normal;font-size:inherit;letter-spacing:0;line-height:inherit;margin:0;max-height:none;max-width:none;min-height:0;min-width:0;padding:0;position:static;text-decoration:none;text-transform:none;text-shadow:none;transition:none;word-wrap:normal;-webkit-tap-highlight-color:rgba(0,0,0,0);-webkit-user-select:none;-webkit-font-smoothing:antialiased} #wistia_chrome_23 #wistia_grid_29_wrapper .w-css-reset-tree img{box-sizing:inherit;box-shadow:none;color:inherit;display:block;float:none;font:inherit;font-family:inherit;font-style:normal;font-weight:normal;font-size:inherit;letter-spacing:0;line-height:inherit;margin:0;max-height:none;max-width:none;min-height:0;min-width:0;padding:0;position:static;text-decoration:none;text-transform:none;text-shadow:none;transition:none;word-wrap:normal;-webkit-tap-highlight-color:rgba(0,0,0,0);-webkit-user-select:none;-webkit-font-smoothing:antialiased} #wistia_chrome_23 #wistia_grid_29_wrapper .w-css-reset-tree a{box-sizing:inherit;box-shadow:none;color:inherit;display:block;float:none;font:inherit;font-family:inherit;font-style:normal;font-weight:normal;font-size:inherit;letter-spacing:0;line-height:inherit;margin:0;max-height:none;max-width:none;min-height:0;min-width:0;padding:0;position:static;text-decoration:none;text-transform:none;text-shadow:none;transition:none;word-wrap:normal;-webkit-tap-highlight-color:rgba(0,0,0,0);-webkit-user-select:none;-webkit-font-smoothing:antialiased} #wistia_chrome_23 #wistia_grid_29_wrapper .w-css-reset-tree svg{box-sizing:inherit;box-shadow:none;color:inherit;display:block;float:none;font:inherit;font-family:inherit;font-style:normal;font-weight:normal;font-size:inherit;letter-spacing:0;line-height:inherit;margin:0;max-height:none;max-width:none;min-height:0;min-width:0;padding:0;position:static;text-decoration:none;text-transform:none;text-shadow:none;transition:none;word-wrap:normal;-webkit-tap-highlight-color:rgba(0,0,0,0);-webkit-user-select:none;-webkit-font-smoothing:antialiased} #wistia_chrome_23 #wistia_grid_29_wrapper .w-css-reset-tree p{box-sizing:inherit;box-shadow:none;color:inherit;display:block;float:none;font:inherit;font-family:inherit;font-style:normal;font-weight:normal;font-size:inherit;letter-spacing:0;line-height:inherit;margin:0;max-height:none;max-width:none;min-height:0;min-width:0;padding:0;position:static;text-decoration:none;text-transform:none;text-shadow:none;transition:none;word-wrap:normal;-webkit-tap-highlight-color:rgba(0,0,0,0);-webkit-user-select:none;-webkit-font-smoothing:antialiased} #wistia_chrome_23 #wistia_grid_29_wrapper .w-css-reset-tree a{border:0;} #wistia_chrome_23 #wistia_grid_29_wrapper .w-css-reset-tree h1{box-sizing:inherit;box-shadow:none;color:inherit;display:block;float:none;font:inherit;font-family:inherit;font-style:normal;font-weight:normal;font-size:2em;letter-spacing:0;line-height:inherit;margin:0;max-height:none;max-width:none;min-height:0;min-width:0;padding:0;position:static;text-decoration:none;text-transform:none;text-shadow:none;transition:none;word-wrap:normal;-webkit-tap-highlight-color:rgba(0,0,0,0);-webkit-user-select:none;-webkit-font-smoothing:antialiased} #wistia_chrome_23 #wistia_grid_29_wrapper .w-css-reset-tree h2{box-sizing:inherit;box-shadow:none;color:inherit;display:block;float:none;font:inherit;font-family:inherit;font-style:normal;font-weight:normal;font-size:1.5em;letter-spacing:0;line-height:inherit;margin:0;max-height:none;max-width:none;min-height:0;min-width:0;padding:0;position:static;text-decoration:none;text-transform:none;text-shadow:none;transition:none;word-wrap:normal;-webkit-tap-highlight-color:rgba(0,0,0,0);-webkit-user-select:none;-webkit-font-smoothing:antialiased} #wistia_chrome_23 #wistia_grid_29_wrapper .w-css-reset-tree h3{box-sizing:inherit;box-shadow:none;color:inherit;display:block;float:none;font:inherit;font-family:inherit;font-style:normal;font-weight:normal;font-size:1.17em;letter-spacing:0;line-height:inherit;margin:0;max-height:none;max-width:none;min-height:0;min-width:0;padding:0;position:static;text-decoration:none;text-transform:none;text-shadow:none;transition:none;word-wrap:normal;-webkit-tap-highlight-color:rgba(0,0,0,0);-webkit-user-select:none;-webkit-font-smoothing:antialiased} #wistia_chrome_23 #wistia_grid_29_wrapper .w-css-reset-tree p{margin:1.4em 0;} #wistia_chrome_23 #wistia_grid_29_wrapper .w-css-reset-tree a{display:inline;} #wistia_chrome_23 #wistia_grid_29_wrapper .w-css-reset-tree span{display:inline;} #wistia_chrome_23 #wistia_grid_29_wrapper .w-css-reset-tree svg{display:inline;} #wistia_chrome_23 #wistia_grid_29_wrapper .w-css-reset-tree ul{box-sizing:inherit;box-shadow:none;color:inherit;display:block;float:none;font:inherit;font-family:inherit;font-style:normal;font-weight:normal;font-size:inherit;letter-spacing:0;line-height:inherit;margin:0;max-height:none;max-width:none;min-height:0;min-width:0;padding:0;position:static;text-decoration:none;text-transform:none;text-shadow:none;transition:none;word-wrap:normal;-webkit-tap-highlight-color:rgba(0,0,0,0);-webkit-user-select:none;-webkit-font-smoothing:antialiased;list-style-type:none} #wistia_chrome_23 #wistia_grid_29_wrapper .w-css-reset-tree ol{box-sizing:inherit;box-shadow:none;color:inherit;display:block;float:none;font:inherit;font-family:inherit;font-style:normal;font-weight:normal;font-size:inherit;letter-spacing:0;line-height:inherit;margin:0;max-height:none;max-width:none;min-height:0;min-width:0;padding:0;position:static;text-decoration:none;text-transform:none;text-shadow:none;transition:none;word-wrap:normal;-webkit-tap-highlight-color:rgba(0,0,0,0);-webkit-user-select:none;-webkit-font-smoothing:antialiased;list-style-type:none} #wistia_chrome_23 #wistia_grid_29_wrapper .w-css-reset-tree li{box-sizing:inherit;box-shadow:none;color:inherit;display:block;float:none;font:inherit;font-family:inherit;font-style:normal;font-weight:normal;font-size:inherit;letter-spacing:0;line-height:inherit;margin:0;max-height:none;max-width:none;min-height:0;min-width:0;padding:0;position:static;text-decoration:none;text-transform:none;text-shadow:none;transition:none;word-wrap:normal;-webkit-tap-highlight-color:rgba(0,0,0,0);-webkit-user-select:none;-webkit-font-smoothing:antialiased;list-style-type:none} #wistia_chrome_23 #wistia_grid_29_wrapper .w-css-reset-tree ul:before{display:none} #wistia_chrome_23 #wistia_grid_29_wrapper .w-css-reset-tree ol:before{display:none} #wistia_chrome_23 #wistia_grid_29_wrapper .w-css-reset-tree li:before{display:none} #wistia_chrome_23 #wistia_grid_29_wrapper .w-css-reset-tree ul:after{display:none} #wistia_chrome_23 #wistia_grid_29_wrapper .w-css-reset-tree ol:after{display:none} #wistia_chrome_23 #wistia_grid_29_wrapper .w-css-reset-tree li:after{display:none} #wistia_chrome_23 #wistia_grid_29_wrapper .w-css-reset-tree label{background-attachment:scroll;background-color:transparent;background-image:none;background-position:0 0;background-repeat:no-repeat;background-size:100% 100%;float:none;outline:none} #wistia_chrome_23 #wistia_grid_29_wrapper .w-css-reset-tree button{background-attachment:scroll;background-color:transparent;background-image:none;background-position:0 0;background-repeat:no-repeat;background-size:100% 100%;border:0;border-radius:0;outline:none;position:static} #wistia_chrome_23 #wistia_grid_29_wrapper .w-css-reset-tree img{border:0;display:inline-block;vertical-align:top;border-radius:0;outline:none;position:static} #wistia_chrome_23 #wistia_grid_29_wrapper .w-css-reset-tree button::-moz-focus-inner{border: 0;} #wistia_chrome_23 #wistia_grid_29_wrapper .w-css-reset-max-width-none-important{max-width:none!important} #wistia_chrome_23 #wistia_grid_29_wrapper .w-css-reset-button-important{border-radius:0!important;color:#fff!important;}
#wistia_grid_29_wrapper{-moz-box-sizing:content-box;-webkit-box-sizing:content-box;box-sizing:content-box;font-family:Arial,sans-serif;font-size:14px;height:100%;position:relative;text-align:left;width:100%;} #wistia_grid_29_wrapper *{-moz-box-sizing:content-box;-webkit-box-sizing:content-box;box-sizing:content-box;} #wistia_grid_29_above{position:relative;} #wistia_grid_29_main{display:block;height:100%;position:relative;} #wistia_grid_29_behind{height:100%;left:0;position:absolute;top:0;width:100%;} #wistia_grid_29_center{height:100%;overflow:hidden;position:relative;width:100%;} #wistia_grid_29_front{display:none;height:100%;left:0;position:absolute;top:0;width:100%;} #wistia_grid_29_top_inside{position:absolute;left:0;top:0;width:100%;} #wistia_grid_29_top{width:100%;position:absolute;bottom:0;left:0;} #wistia_grid_29_bottom_inside{position:absolute;left:0;bottom:0;width:100%;} #wistia_grid_29_bottom{width:100%;position:absolute;top:0;left:0;} #wistia_grid_29_left_inside{height:100%;position:absolute;left:0;top:0;} #wistia_grid_29_left{height:100%;position:absolute;right:0;top:0;} #wistia_grid_29_right_inside{height:100%;right:0;position:absolute;top:0;} #wistia_grid_29_right{height:100%;left:0;position:absolute;top:0;} #wistia_grid_29_below{position:relative;}
How to create a Material Lead Time?
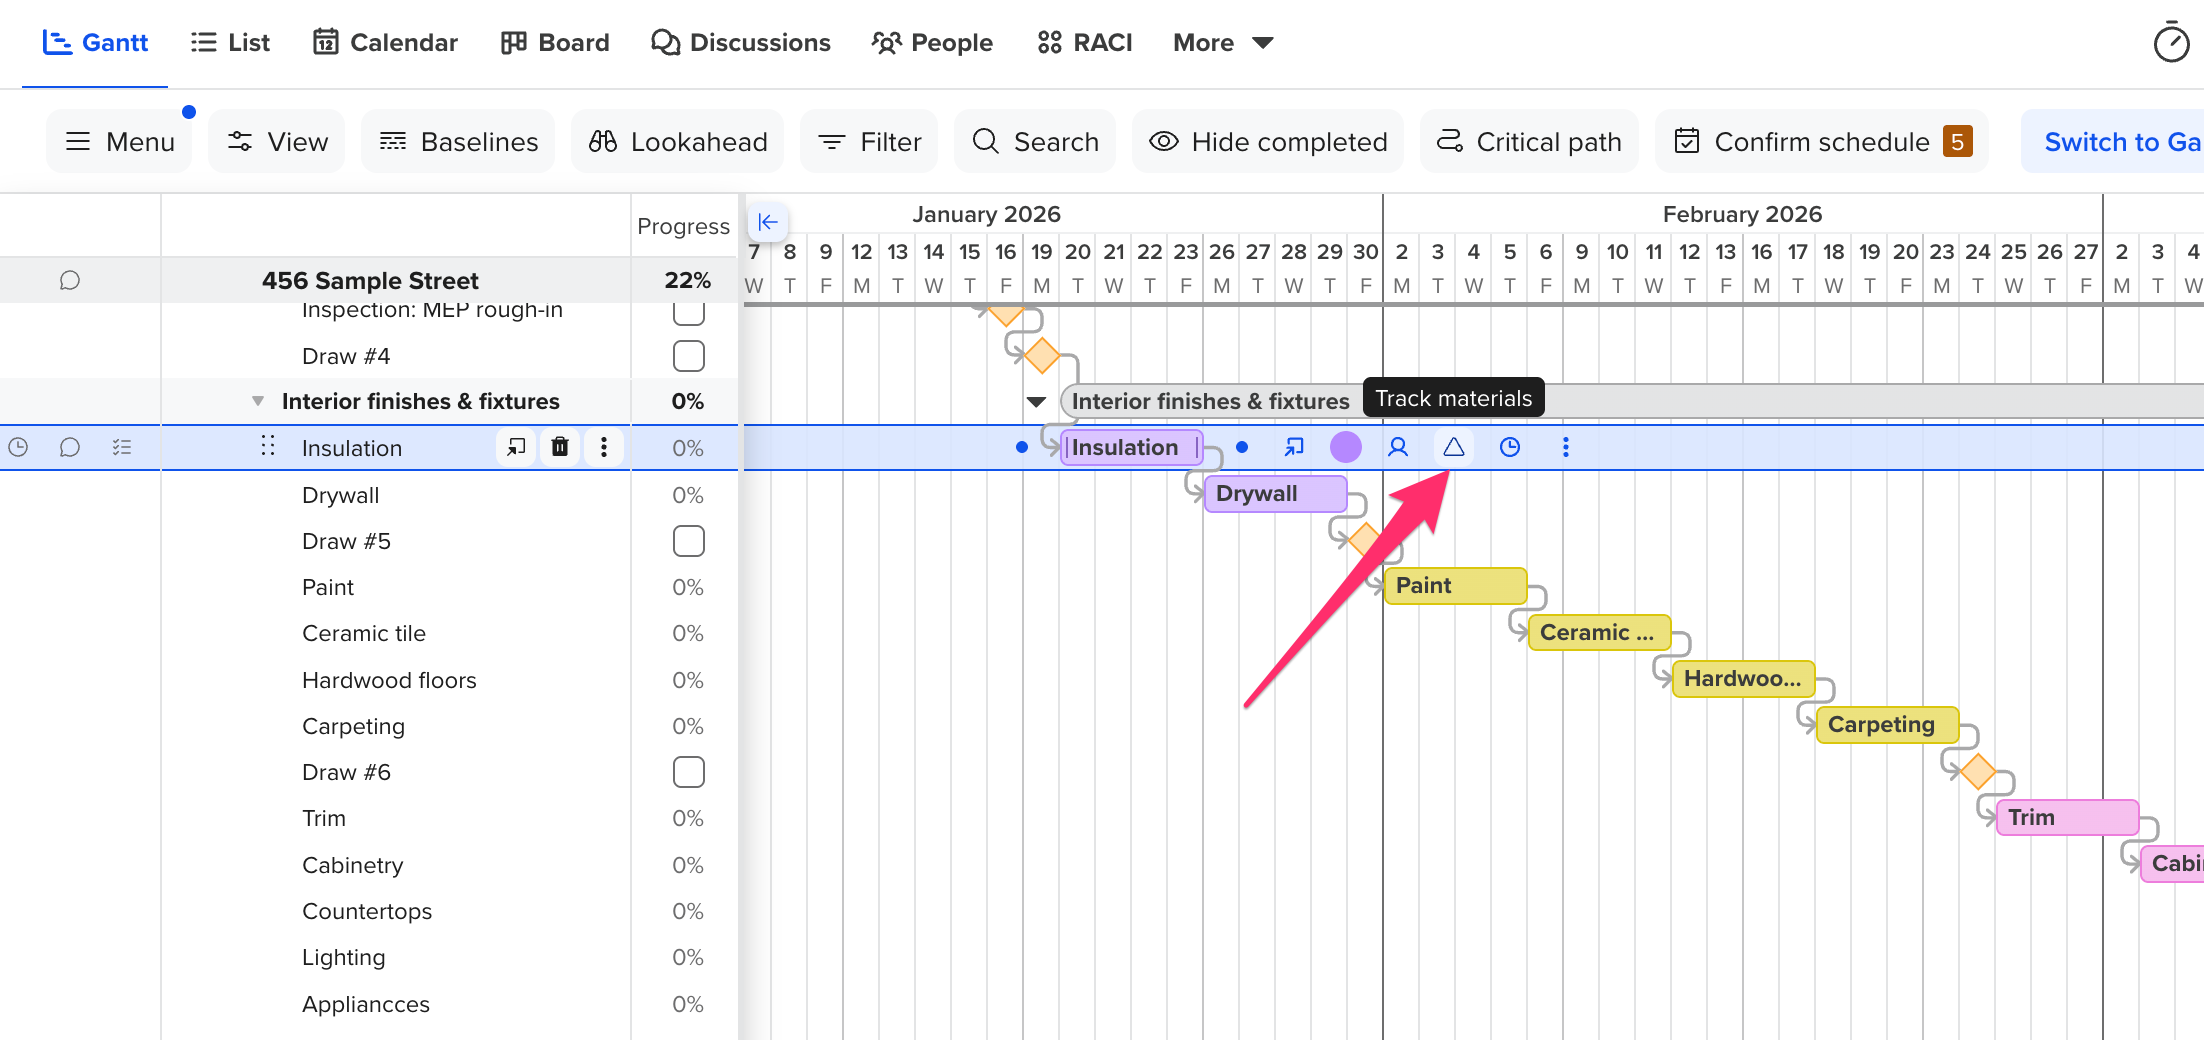
To create a Material Lead Time, first, hover over a task bar and click the Track Material icon.
Next, you have the option to enter a
Required on Job (ROJ) date. This is the date that all materials are required to be on the job. If you do not enter an ROJ date, the lead times will be based on the start date of the task. 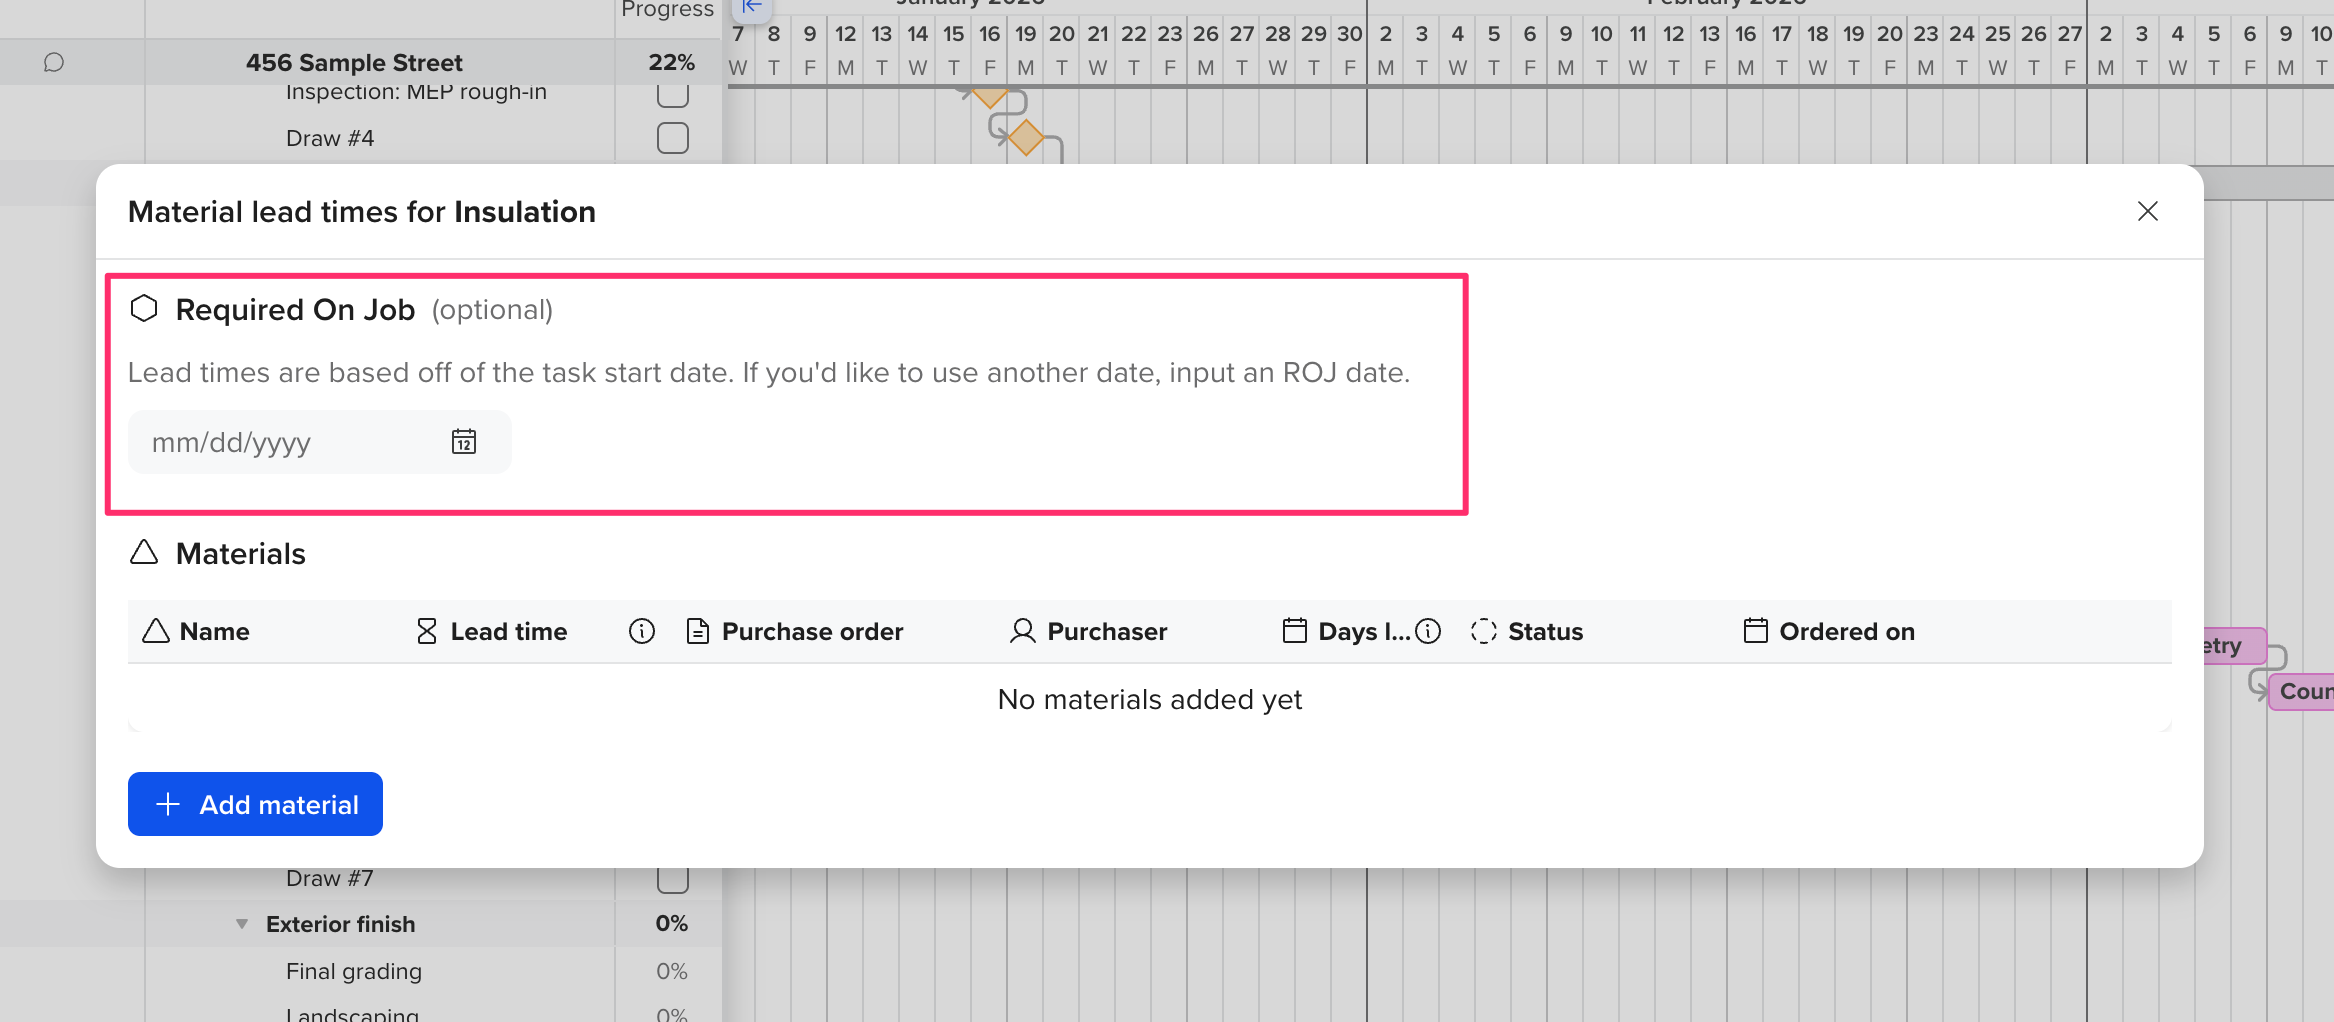
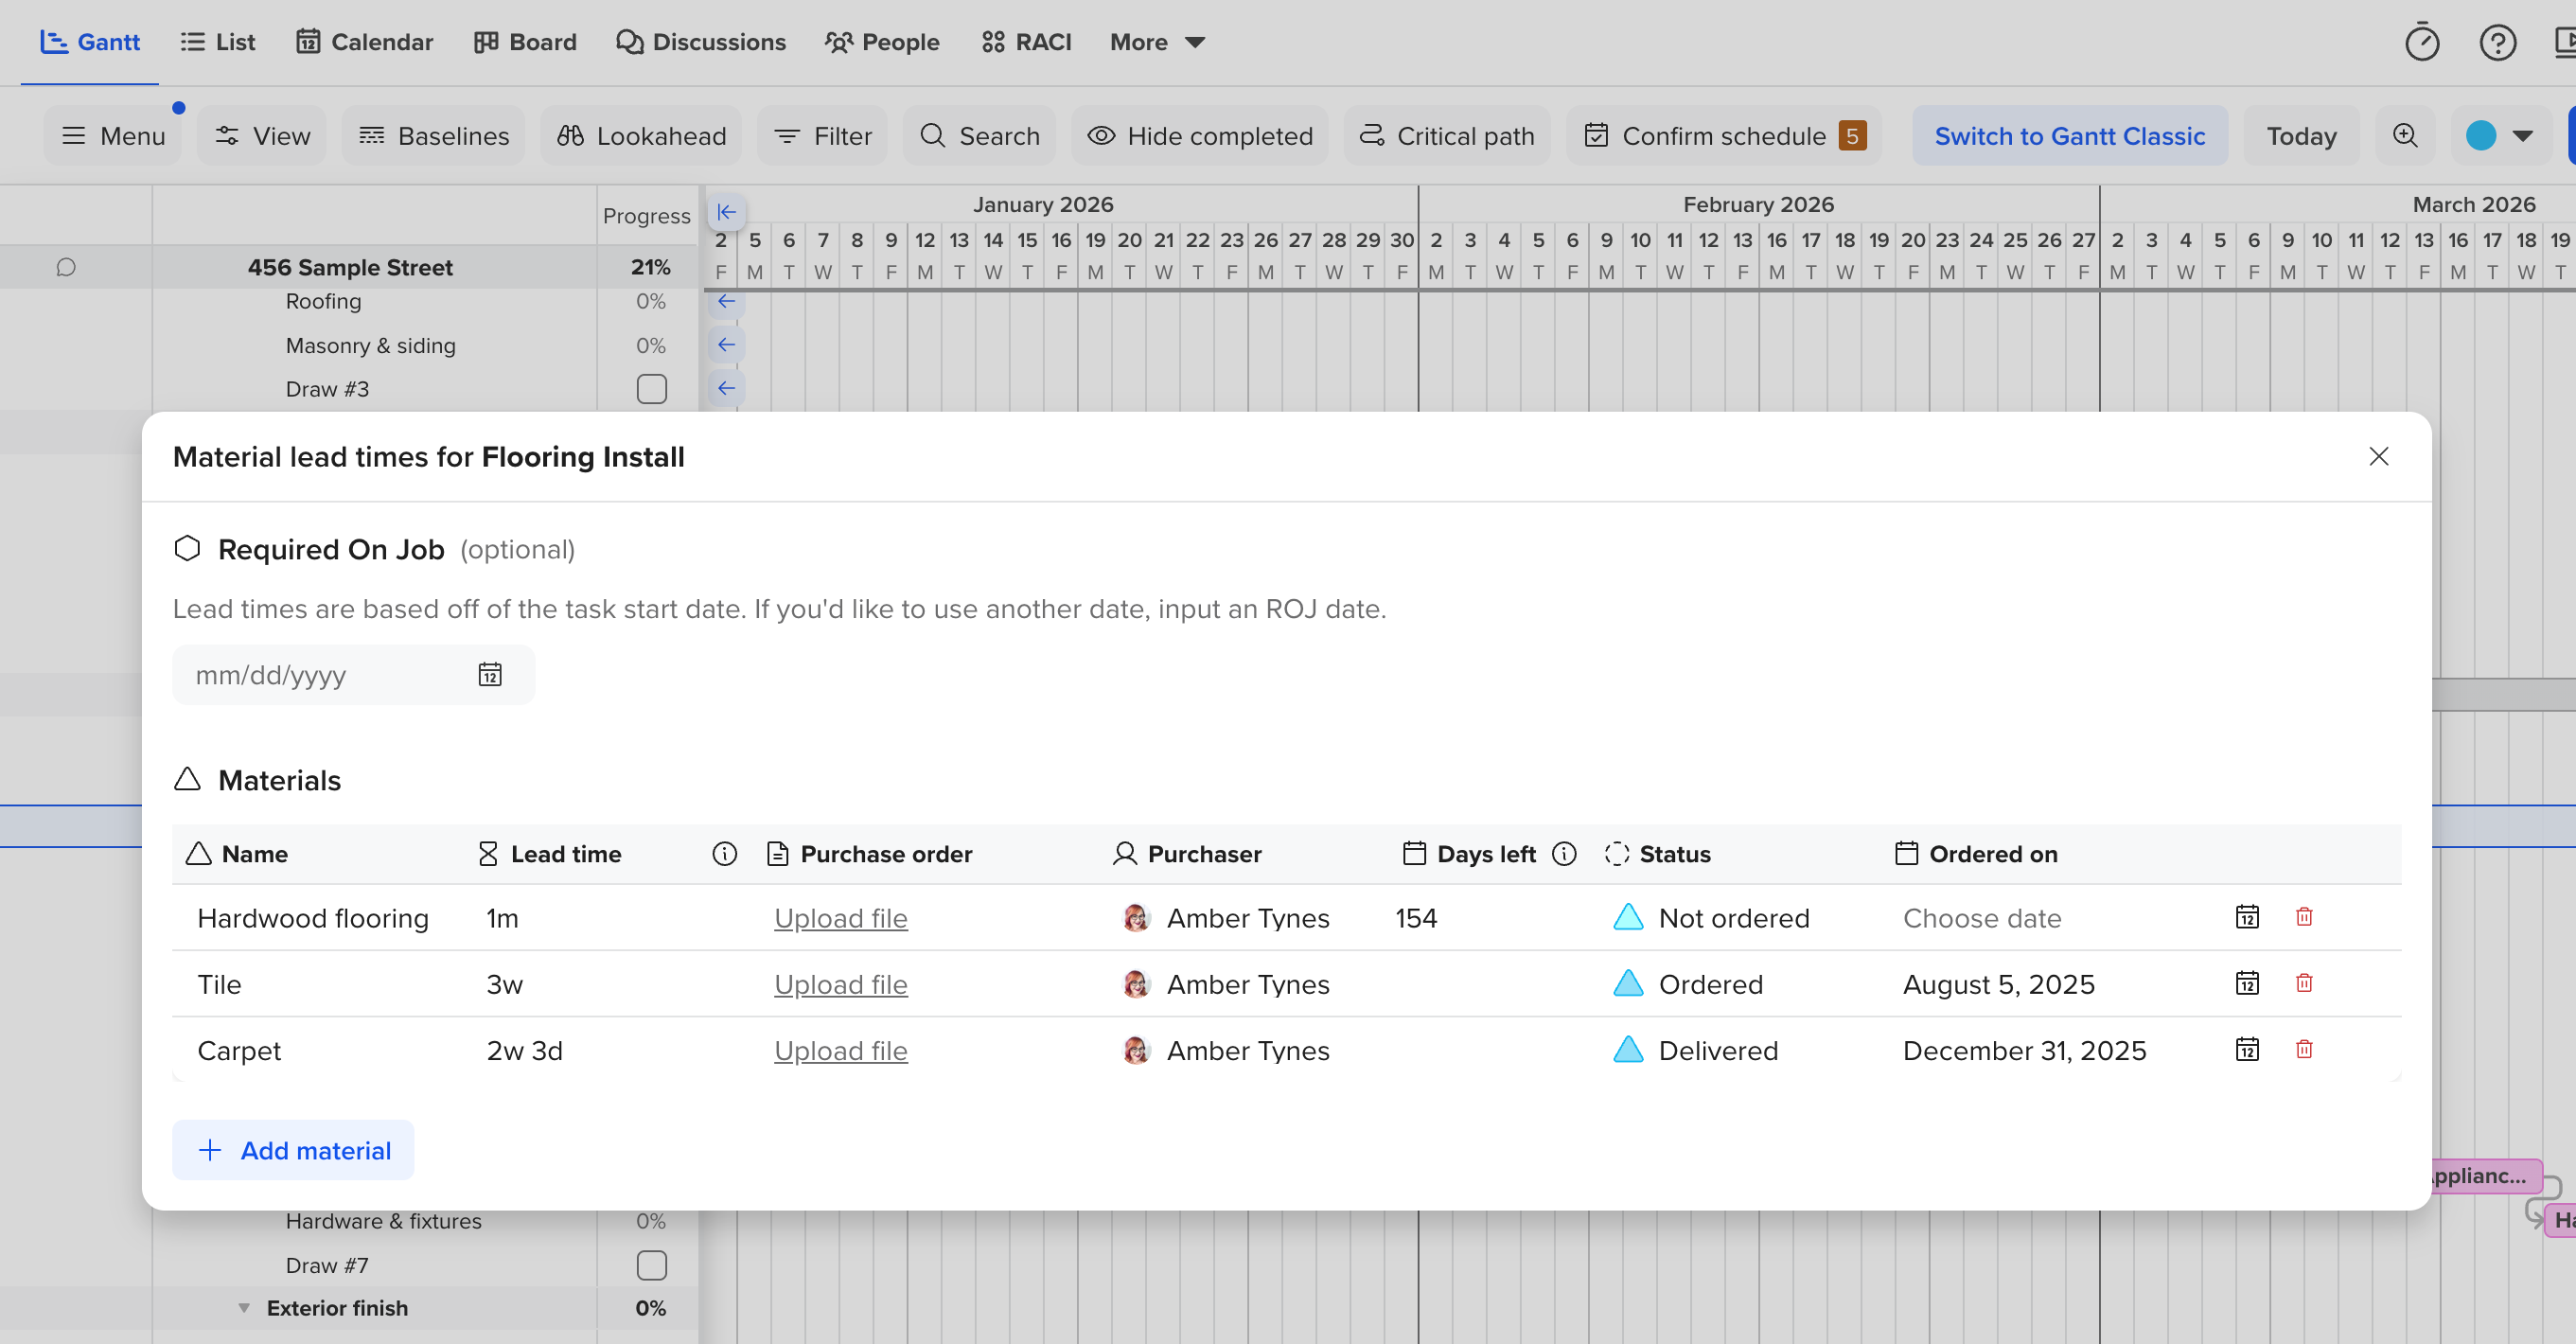
Now, you can add your materials by clicking + Add material. A material will have a name, a lead time, an option to upload any purchase orders, assign a purchaser, and select a status. Days left will be automatically populated based on the ROJ date.
 Note: Lead time can be entered in the format of 0m 0w 0d.
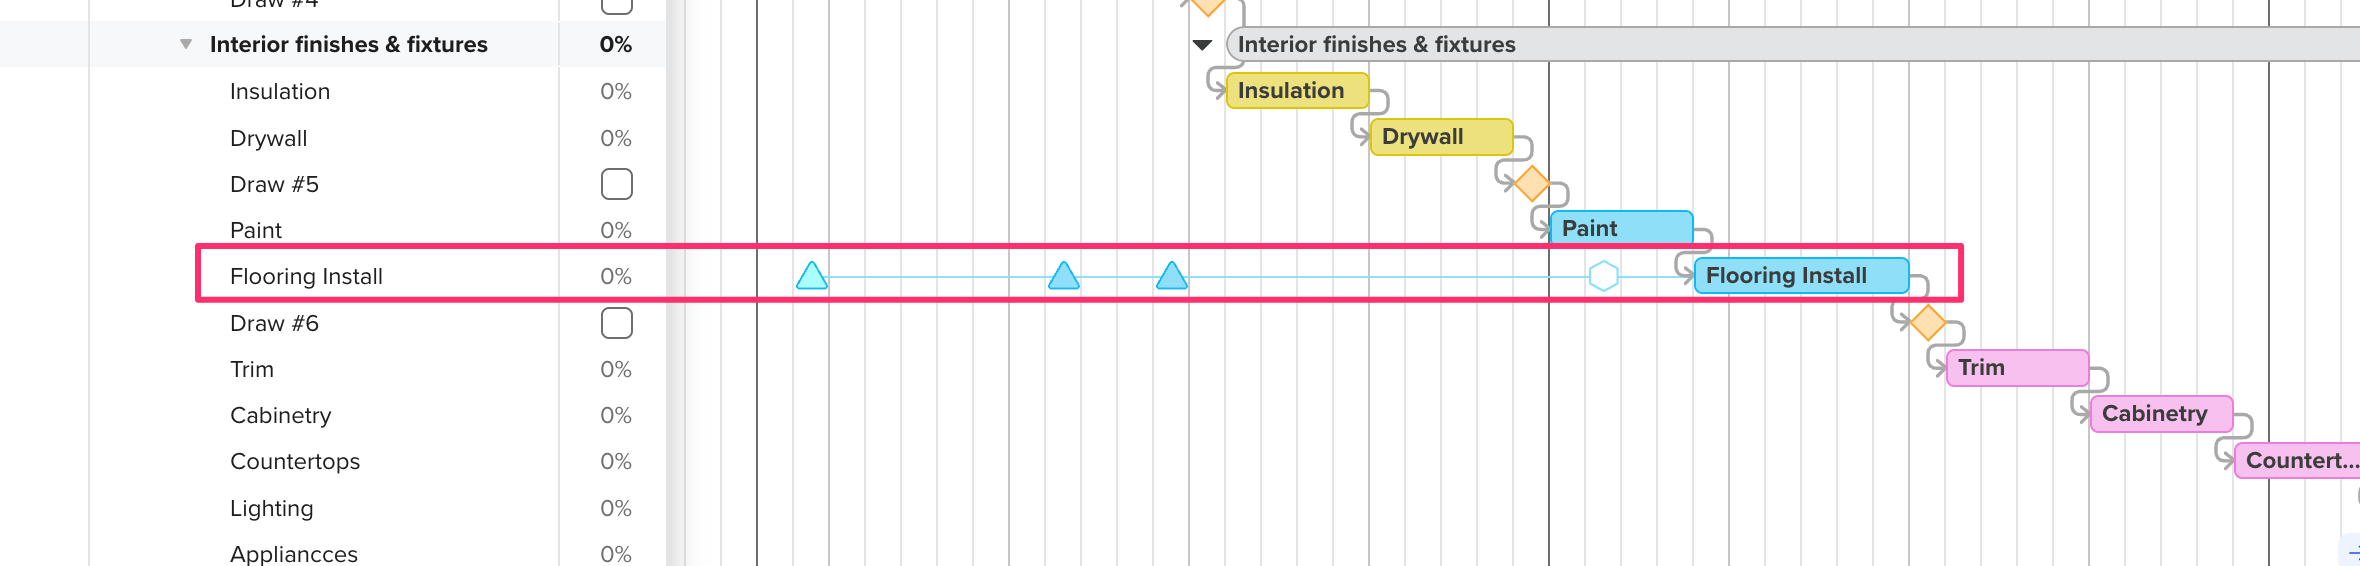
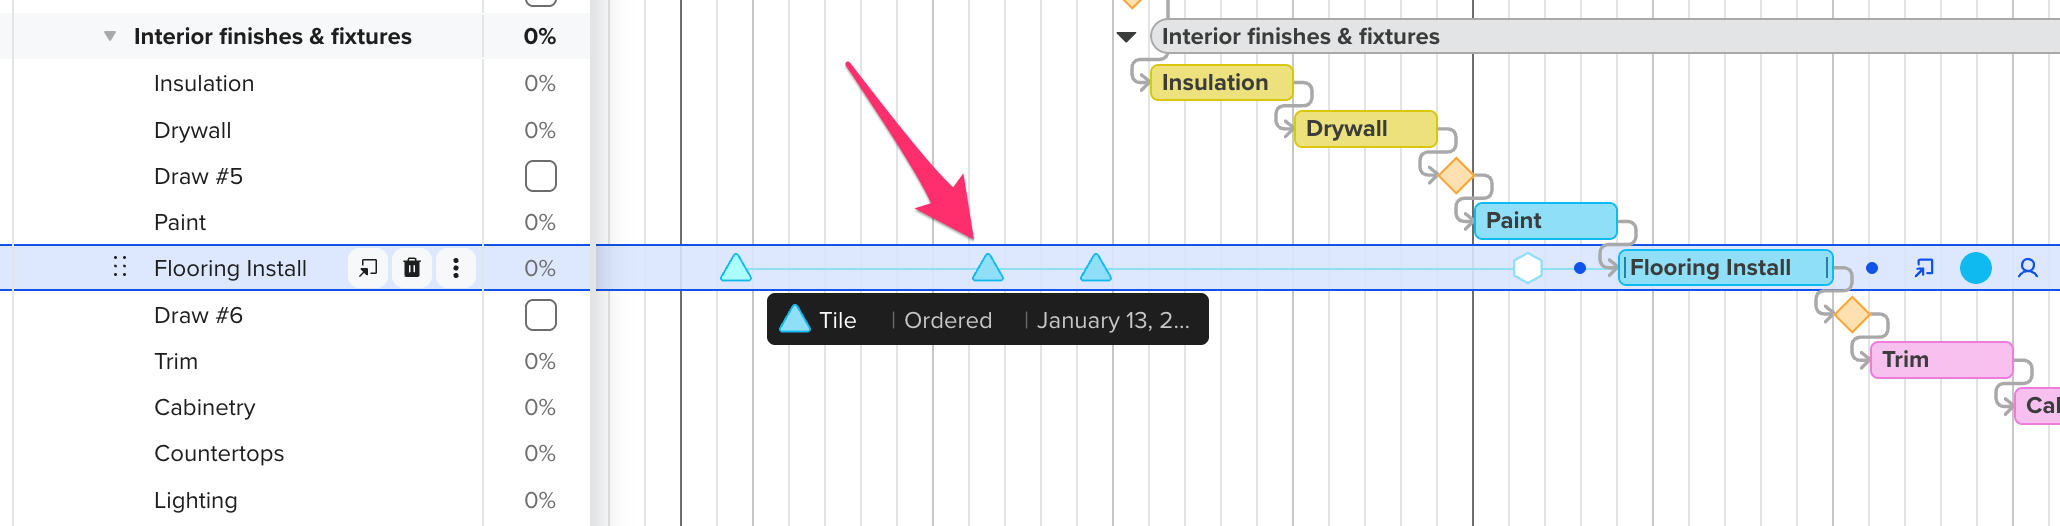
Once materials are added, they will display on the Gantt chart as colored triangles on the same line as the task. The ROJ will be represented by a hexagon.
How do I know if a material has been ordered?
When a material has been ordered, the material icon (triangle) will be shaded. If a material has not been ordered, the material icon will not be shaded.
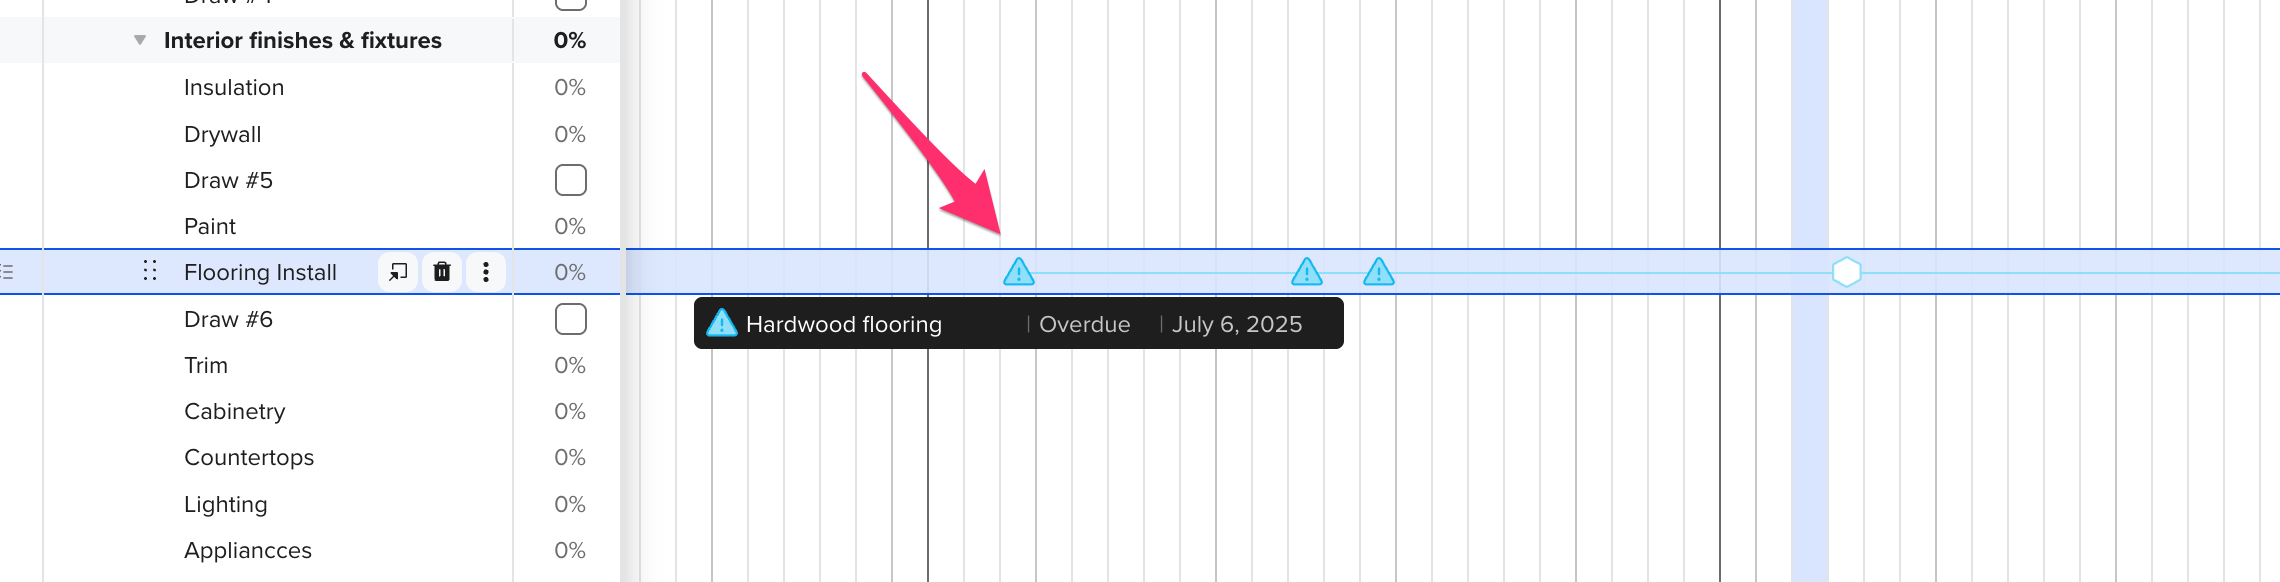
How to tell if a material is past due to be ordered?
If a material is past due to be ordered, an exclamation mark will appear in the middle of the material icon.
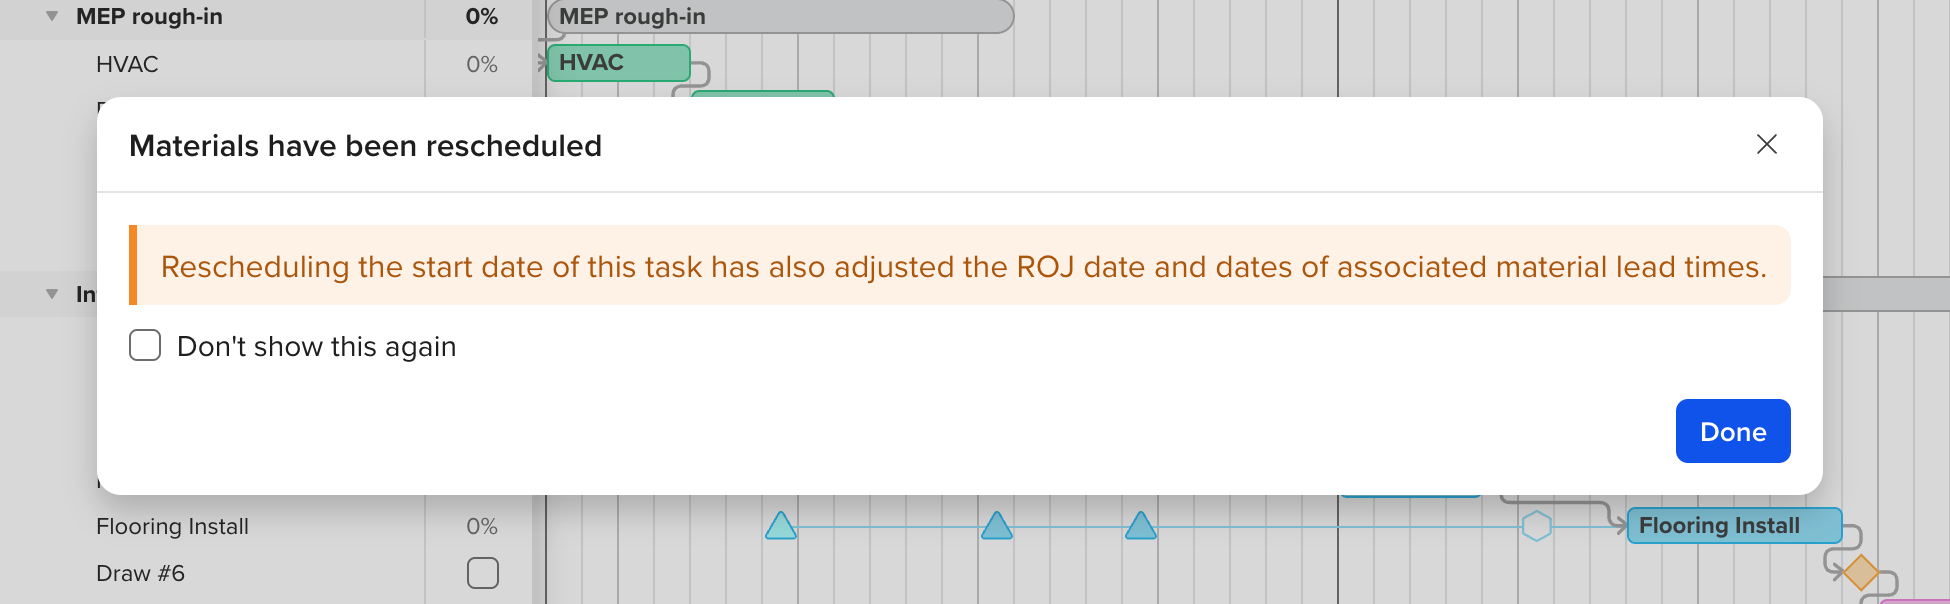
What happens to my Material Lead Times if I reschedule a task?
If you reschedule a task, your materials and ROJ (if necessary) will automatically be rescheduled. A notification will appear informing you that the materials have been rescheduled.